
Preface#
🤯
Some time ago, I accumulated some APIs, but I didn't use them much. They were mainly used for the AI summary function of my blog. I often forget the account passwords for these platforms, which made me decide to use OneAPI for unified management. Although the author of OneAPI provided detailed tutorials, some users (including myself) still encountered some small problems during deployment. Therefore, after successful deployment, I decided to write this detailed deployment guide for beginners with poor foundations, hoping to help everyone avoid detours.
Project Introduction#
OneAPI Project is an open interface management and distribution system that supports various large-scale language models, such as OpenAI's ChatGPT, Azure, Anthropic Claude, Google PaLM 2 & Gemini, etc. It aims to perform key management and redistribution, can be deployed through a single executable file or Docker, and provides a simple and unified API to access different large-scale language models. This system is open source and uses the MIT License, providing model support, token management, user group management, and other functions. For specific deployment and configuration instructions, users should refer to the GitHub repository and documentation of this project.
Project Setup#
This project provides Docker images to simplify the deployment process. We can deploy more easily.
By default, SQLite database is used. If the environment variable SQL_DSN is not set, the database file will be stored in the path specified by the Docker container. If the SQL_DSN environment variable is set, the application will connect to the MySQL or PostgreSQL database you specified. This way, our previous changes will not be lost when we redeploy or pull the image.
Preparation#
- Free container platform that supports Docker, such as Render or Zeabur.
- MySQL or PostgreSQL database (optional, recommended for data persistence).
- A domain name (optional).
Deployment Steps#
Choose the hosting platform you want to use#
- Hugging Face: Fast but does not support binding domain names, access from China may be restricted.
- Render: Supports binding domain names, registration may require binding a credit card.
- Koyeb: Supports binding domain names, requires upgrading the plan.
- Zeabur: Fast access, supports Chinese, deploying Docker images requires upgrading the plan.
Deployment Process#
Note
Deployment on Hugging Face
- Copy Docker Image
Click the button Copy Image, configureTHEME(interface theme, such asdefaultorberry) andSQL_DSN(database connection). I will list them in detail below
Note
The effects of different themes are as follows. Choose according to your preference.
::: grid {cols=2,gap=4}
Default Theme
Berry Theme


:::
- Database Configuration
-
Use a free database service like Aiven or
Planetscale, or the free databases provided by Render and Koyeb; configure the environment variableSQL_DSNfor the project: -
MySQL example:
SQL_DSN=root:123456@tcp(localhost:3306)/oneapi -
PostgreSQL example:
SQL_DSN=postgres://postgres:123456@localhost:5432/oneapi2.1 Register and log in We enter the aiven platform to register or log in to an account.

2.2 Fill in the information Select personal service and fill in the basic information.

2.3 Choose the database Select MySQL or PostgreSQL database.

2.4 Database configuration Select the free plan, choose the service region, and finally click create.

2.5 Final configuration Take note of the information in the figure, and skip all the way. It's okay if you don't remember, we can still see them after skipping all the way.

- Fill in the variables
Based on the database information in the figure, we get this:
Service URI:
mysql://CLICK_TO:[email protected]:10906/defaultdb?ssl-mode=required
Host:
mysql-12a9c26-jonastech007-2d92.b.aivencloud.com
Port:
10906
User:
avnadmin
Password:
AVNS_QV8niFI8YW48vKqxi3R
Our connection address should be written like this: username:password@tcp(Host:Port)/database name
Finally, we get this link: avnadmin:AVNS_QV8niFI8YW48vKqxi3R@tcp(mysql-12a9c26-jonastech007-2d92.b.aivencloud.com:10906)/defaultdb
Fill in this link to the variable, and finally click Duplicate Space to copy it to the space.

- Access
At this time, we can access our service by clicking on the settings in the upper right corner and finding Embed this Space, and using the link below.


Note
Deployment on Koyeb
- Click to enter the Koyeb official website, log in or register, and click create network service to select the Docker image.


- Enter
justsong/one-api:latestin the input box. If you don't know where this comes from, you can check the compose.yml in the open source project.
https://github.com/songquanpeng/one-api/blob/main/docker-compose.yml
${REGISTRY:-docker.io} is an environment variable expression, which means that if the environment variable REGISTRY is not set, the default docker.io (Docker Hub) will be used.
justsong/one-api:latest specifies the name and tag of the image, where justsong is the username or organization name on Docker Hub, and one-api is the image name. latest means to use the latest version of the image.

3. After setting the necessary variables and region information, click the deploy button.

4. ⌛️ After waiting for the deployment to complete, we can click on this address to access our One API.


5. The default administrator account is
- Username: root
- Password: 123456
After logging in, you should immediately change it in Users to ensure the security of your account.

Usage#
Considering that most of the people who can read my article are beginners, I will demonstrate the usage of OneAPI. Taking the free API 头顶冒火 as an example.
If you are not familiar with it, you can learn about it yourself or watch this article.

OneAPI Configuration#
-
After logging in to the administrator account of OneAPI, find Channels and click Create Channel.

-
We can name the channel arbitrarily. The channel API address is the forwarding address. Since I am using 头顶冒火 as an example, I only need to fill in its request address:
https://burn.hair. Then select Supported Models; add your API KEY, and finally submit.


-
Finally, click Not Tested, and test the connectivity of the API.

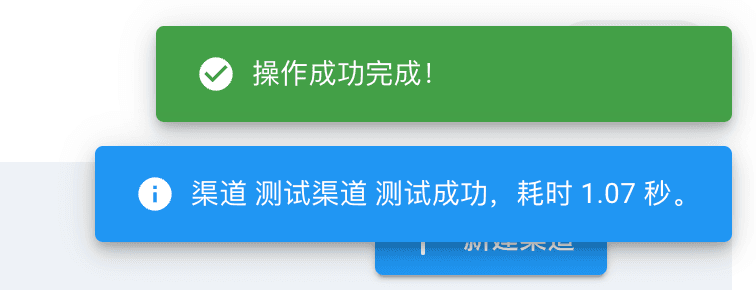
-
After the test is completed, we can create a token in the Tokens section for distribution and use. If you want, you can also share your website after adding many APIs, so that everyone can use it.
We only need to maintain the channels of various APIs in the background. As for the request address of our OneAPI, it is our domain name by default, and you can also change it in the settings.


Conclusion#
In fact, many commercial accounts also use OneAPI or NewAPI. It is not so difficult to operate, but you feel it is troublesome and don't want to understand it. Now Azure registration still gives a $200 credit, and there are also many FreeAPI projects on GitHub, and there are even more on linux.do. It is completely impossible for personal daily use.
Well, it's late, I'll have breakfast and get ready for work. Another day of staying up all night🙂.
This article is synchronized and updated to xLog by Mix Space
The original link is https://www.laogou666.com/posts/AGI/OneAPI